Welcome!

Welcome to my world of pipes. On these pages you will see some of what goes on in my workshop. A bit of work-in-progress, mess-ups (they do happen!) and also some other pipe-related posts.
I love talking about and discussing pipes, so feel free to contact me at charl.chillfactor@gmail.com.
Should you wish to have a look at my pipes, please drop in at my website (http://goussardpipes.com/).


September 24, 2012

Freehand?!

My Longman dictionary say the following:
free-hand drawn with your hand and a pen or pencil
Now I suppose the fathers of the English language did not necessarily smoke pipe (if not, they should have!) and that they therefore would not have thought of pipes when deciding on the meaning of this word, but what is a freehand pipe?
 Since starting with pipesmoking many moons ago, learning bit by bit and then getting into the making as well, this "shape", if you can call it that, has puzzled me. 
If a customer asks for a freehand, I get cold fever, my eyes glaze over and knees buckle,making me frantically grab my whisky glass to go pour another. The thing is, if you ask a hundred pipesmokers, well, you are going to get a hundred and one answers.

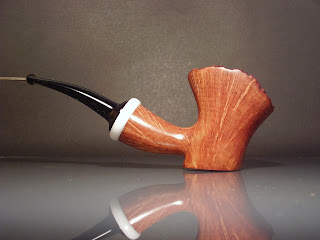
For most oldtimers (and even some younger smokers) the above pipe is a freehand. For me the old "danish style" freehand from the 70's. It usually was made from plateaux, normally didn't have any significant  grain, with a bit of bark on the the end of the shank and most of the time on the rim as well. It also was quite normal to sport a "fancy" stem with rings and whatnot. Most of the ones I have seen are sandblasted as well.
For other smokers, the term freehand refers to freehand drilling. This is where the pipe is shaped first, then drilled freehand. Any of the standard shapes can theoretically be made using this method, along with more unconventional shapes. Should a freehand-drilled and a lathe-drilled pipe be put next to each other though, there will be no way you would be able to differentiate which is which. This type of thought would be the younger generation of smokers. Most are using the Internet extensively, so they would have exposure to freehand drilling from some of the high end makers.
Then there are the pipe smokers for whom freehand refers to a non-standard shape. These would be more "organic" free flowing forms that might (or might not) follow the grain of the wood. For some smokers even an amorphous raw block with basically just the edges taken away, could be termed a freehand.
Now what does a pipe maker have to do when asked for a freehand? He asks for an idea, a pipe the person related to, a sketch, basically anything that will push him in a direction. That helps.
It also helps if it is a returning customer and you have an inkling of the customer's taste in pipes.
But then the most dreaded of replies also happen. That is when the customer answers: Surprise me. Just make a freehand.


August 14, 2012

On the bench

I haven't done a billiard in a very, very long time. Not because I do not want to and not because I do not like them, but purely because for me to see a billiard in a block of briar, is a nearly impossible task! Block after block I see pipes with wonderful curves. 
 The biliard is one helluva shape, with proportions that seem quite easy, but deceivingly so. Bowl height should be more or less the length of the shank, the bowl should be round and slightly fatter around the middle, the bowl should be canted forward ever so slightly, shank and stem should taper a tad, etc. Exactly because of these definite guidelines, a billiard is very good exercise in pipemaking.
This one is in the final finishing. It has been sanded to 400 grit and a couple of tweaks here and there might still occur. The stem inserts are briar, an stem and shank adornment that I think is grossly underestimated. At the moment (and that might differ from tomorrow!) I see the pipe in a reddish stain, with the stem inserts in some contrasting colour.

May 27, 2012

Tamp!

I am normally not big on tampers. In fact, I often find that I have to remind myself when in company to use one!
 But in this case I thought that a tamper would supplement the pipe.
 The tamper has kudu horn as tip, an acrylic black ring and briar at the front.
For a first tamper, not too bad, hey!

May 8, 2012

My little heaven

I have had a couple requests lately from friends asking to show them what my shop look like. For me it's not the "Shop". This is my little part of heaven. This is where I forget about the worries, stress and problems of living a normal life in a normal world. This is where I loose myself and time disappear.
Enjoy!

Most of my time making pipes is spent here, at this table. From designing and drawings, through to sanding and staining and everything else inbetween. I have my old radio close by, inherited from my aunt and always tuned to a station playing classical, jazz and blues. Files, stem inserts and little bobs and ends for stems on the right. Stains and more bits and pieces in front, along with different grits of sandpaper. On the left bamboo, ebonite rods and more magic potions. Basically all needed for finishing.
I am not very fond of using the term "station". For some reason it reminds me of a factory, and my pipemaking is not at all close to that. I normally work in no apparent order, with a bit of sanding on the disc, then a bit of lathe work, then filing a stem, etc. Basically, I suppose for want of a better word, erratically!
Above photo is where I do most of my machine sanding. On the left is a slack sander with 400 grit belt, used for finish sanding, but before hand sanding. The motor in the middle is for rough shaping with 24 grit and the one on the right for 60 grit and 240 grit. I also have a jacobs chuck attached to this one, which is handy for freehand drilling, countersinking and so on.
 My trusty old lathe and bandsaw.
The lathe is an Emco, which I picked up for dirt cheap. All the attachments, chisels, cutters, chucks and etc thrown together would be worth 10 times more than what I paid for the lathe itself.
The bandsaw is an updated one from the dilapidated one that I started off with, compliments from a good friend who wanted a couple of pipes.
 When I started making pipes, I had a drillpress. And that was the sumtotal of my electric tools. Its amazing what can be done with a single tool if you put your mind to it! Nowadays I of course use it much less, but I can't imagine not having one. There is always something that it'll be used for.
The small bench/beltsander I use for squaring blocks and occasionally for stemwork.
Last but not least: my briar faerie!

April 9, 2012

Stemwork Part 3 - Finishing

This is where I finished last time. The rod was rough-sanded and filed, and checked with a small square to keep it straight from tenon to tip. The button also have not been worked on yet.
Just by the way, most pre-formed tapered stems will not have a straight line from tenon to bit.
Now I will start working the button. First it is rough shaped on the 25mm beltsander and then fine tuned with files and nailfiles, until I'm satisfied with the shape.

Then the rest of the stem follows. Depending on the condition of the stem at this stage, I start with sanding in either 220 or 320 grit. If I did the job well, most cases will start with 320 and then work up towards 400 grit. Sanding above 400 grit is a waste of time, because the tripoli I use (and most other guys, I think) have a grit of 400.

For the 5mm or so just in front of the button, I use nail boards. Just with sandpaper you just can't get that bit sufficiently smoothed.

And here is the stem just before polishing. Every millimeter has been sanded and smoothed. Ebonite is a bit of a bugger and polishing might just reveal a little scratch or indentation that was missed, and it might just be that you have to go back and repeat a step or two.

Final wax with carnauba and a clean wheel and that is it!


March 13, 2012

Stemwork Part 2 - Rough shaping

Last time we finished with the drilling done and the airway polished. This time the post is about rough shaping the stem. Again, I do not propose this to be the "right" way, I'm merely showing what works for me!
In the first step, I take the stem to a sanding disc, where I'll start with 60 grit and get the taper (i.e. on a tapered stem) and rough shape going. This will be followed by a 220 grit disc.
How do you like that button?
That was the easy bit. Now the elbow grease starts. First I use a very rough file to get the shape more defined. I'll also do a rough-over of the stem/shank joint, to get it smoothed. And I'll also work up the shank towards the bowl a bit.

Then I move onto the bit side, thinning the bite down, while also keeping in mind that the top and bottom of the taper have to form a straight line.

File work, lots of file work and then filing, filing and some more filing!

Next the button will be thinned down. In this step it is important to use an edge-safe file, of course. It's happened quite often that I have the file the wrong way around! So take care and double-check yourself.

When everything is more or less roughly the way I would like the end product to be, I'll have a look at the thickness of the bit. Sanding and final finishing will still remove a couple of microns. I normally at this stage like to have the bit thickness by at least 4mm, but preferably a tad less.


I know these couple of photos and bit of text only gives you the rough idea, so please feel free to contact me should there be any questions.

Next we will be looking at final sanding and finishing.


March 5, 2012

Stemwork Part 1 - drilling

I realise that there are a lot of "how-to" regarding pipe making on the web, but nevertheless thought that some people might find it interesting to see how I make a stem. Let me first off say that I do not propose that this is the "right" way. As in most cases regarding pipe making, this is merely the way that works for me and the way that worked with this specific pipe.
Right, that off my chest, let's start.
I cut a piece of ebonite to the specific length that I want. As I make integral tenons, this will be the eventual stem length plus tenon. Normally I would first round one half, flip the ebonite around and then round the other half, but as the diameter was very close to the eventual diameter needed, I left this step aside.
Its normally quite an important step actually, as most pipemakers would know that a round rod is most often not round at all!
First off, the blank is faced. I then take a brad point 4mm bit that is pushed as deep as possible into the jacobs chuck, to start the hole. This is done to assure that the flex of the bit is minimized as much as possible so that the hole will be centered.
This "starter" hole is then followed by a tapered bit. The depth of this cut will finish 10-15mm before where the bit eventually will be.


Next is the turning of the tenon. The mortise depth on the stummel is measured and transferred onto the rod. The tenon is turned to within a hair width of the required diameter. From here on the fit is tried after every pass, as little by little is taken off. When the fit is satisfactory, the tenon is bevelled and the air hole countersunk. Last of all the tenon is polished.


One last step to be done on the lathe: the rod is flipped over and the last remaining bit of the tapered airway drilled through with an 1.5mm bit.


The cutting of the slot is next. This I do with a dremel cutting bit (the specific number I unfortunately can't remember!) in a drill press. The ebonite is held flat in a drillpress vice.


Now the bit is widened into a funnel shape. This is done by using the 1.5mm bit and basically "smearing" it, working it back and forth, using the cut to widen the slot.


Next up the slot is cleaned up with needle files, with the final step to this part of the process, polishing the inside of the airway with a pipecleaner.


Keep an eye open for Part 2, which will be about the shaping of the stem.


February 14, 2012

Freehand drilling - Part 2

Some of you guys might remember that I had a disastrous previous episode with freehand drilling. This is my second attempt at it, although somewhat of a wuzz-try I admit!
Here is how I did it this time around:


First I drew out all the lines for air hole, mortise and tobacco chamber. Then small off cut pieces of briar was glued into place as in the above photo. These were used as support for a live center in the tail stock of the lathe, with the bit chucked into the headstock.


With freehand drilling, the drilling procedure works a bit different for me than with normal drilling. First I drill the mortise, as normal.


But then I immediately went to drilling the chamber, instead of the air hole. The above photo shows where I am using a normal spade bit to pilot the hole.


Here you can see how the tail stock is used as support to feed the stummel onto the bit. After the initial cut with normal spade bit, a chamber bit is used to finish the hole.


The final step was to drill the air hole. This time the drilling was done real "freehand".


PS - Dead center this time around.


PSS - No whisky needed to drown my sorrows, although a celebratory one was consumed!


January 30, 2012

On the bench

The beginning of the year so far has not been much fruitful regarding pipe making.
First off, my holiday went wrong. Ask me what my ultimate holiday would be, I would most definitely say that it would be undisturbed and unlimited time in the shop. The two weeks of holiday that I had since just before Christmas, was not really holiday at all. It was spend on doing those things that's been dragging on for way too long, but just had to be done. Yip, you guessed it: painting, varnishing, gardening, etc.
Then, as if that was not enough, we had visitors for 3 weeks.
So, after all that wasted time, I eventually came up with these 3 pipes on the bench.
The little saucer with bamboo insert started life off as a bulldog that surprised me with awful fissures and cracks on the rim. It's been lying on the bench for a couple of months, until I picked it up and decided to play around with it and a sanding disc. I'm not really sure which way I'm going with the stem yet, but I have a couple of ideas.
The rough shaped stummel on the right is destined to be my 2nd try at shape-first, then drilling. Hopefully you'll see a glorious post about this. If you do not, do not ask.
The pipe in the middle started off with a long shank and the idea to give it a short saddle bit, with maybe a bit of green acrylic thrown in, to keep with the flowery theme. But alas, briar is a fickle friend (or sometimes fiend) and the shank broke. I'm very happy with the result so far, though. Stamping, polish and wax still to come and this one will be ready.